Your Dishwasher Needs Cleaning Too: Filter, Spray Arms, and Seals
If your glasses are coming out cloudy, your plates smell faintly sour, or your dishwasher just is not drying like it used to, the machine itself is probably dirty. Here is the once-a-month maintenance routine that fixes all three problems.
A dishwasher is one of the most forgiving appliances in the kitchen. You can overload it, use the wrong detergent, and ignore it for months, and it will still mostly do its job — until one day it does not. That was the situation in my house last winter: plates came out with a chalky film, glasses looked like they had been washed in milk, and every few cycles the whole kitchen carried a faint, wet-dog smell. I assumed the machine was dying. In reality, the filter was clogged, the spray-arm holes were blocked with food grit, and the door gasket was hiding a layer of greasy black slime. Thirty minutes of cleaning fixed what I thought was a $500 repair.
The twist is that the dishwasher is cleaning itself a little every time it runs, but it cannot flush away everything. Tiny food particles collect in the filter. Hard-water minerals build up on spray arms and the heating element. Grease and soap residue cling to the rubber gasket around the door. Over time those deposits reduce water pressure, block the rinse cycle, and trap odors. The good news is that the fix is simple, cheap, and needs no special tools. This guide walks through the full monthly maintenance routine: filter, spray arms, seals, and a finishing vinegar cycle. It is the same basic approach appliance manufacturers like Whirlpool recommend for keeping a dishwasher running well.
Why a “Self-Cleaning” Machine Still Needs You
Modern dishwashers do rinse themselves with hot water during each cycle, but that rinse is only as clean as the water and the drain path allow. When food particles are too large to pass through the filter, they sit there and break down slowly. The result is the same smell you get from a garbage disposal that has not been flushed. Meanwhile, Pacific Northwest water tends toward the harder side in many neighborhoods, which means dissolved calcium and magnesium settle out as the water heats and dry. Those minerals coat spray-arm jets, shrink their openings, and lower the water pressure that actually cleans your plates. The Department of Energy’s dishwasher efficiency guidance notes that scale buildup and clogged spray paths can quietly raise energy and water use because the machine has to run longer or hotter to get the same result.
The door gasket is the third trouble spot. It is a soft rubber tube that runs around the door opening, and it stays damp for hours after every load. That dampness plus tiny food splashes create a perfect environment for residue. You will know it is dirty when you run a finger along the inside fold and it comes back gray or black. The gasket also helps the door seal, so keeping it clean and flexible matters for leaks and drying performance.
Cloudy glasses, sour smells, and poor drying are usually not a broken dishwasher. They are a dirty dishwasher.
What You Will Need
Everything here is probably already under your sink. Skip the fancy tablets and scented cleaners for this routine; plain household products do a better job and leave no residue behind.
| Supply | Used for | Notes |
|---|---|---|
| White distilled vinegar | Mineral scale and odor | A cup in a bowl on the top rack is enough for a full cycle. |
| Baking soda | Deodorizing and light scrubbing | Sprinkle a cup on the empty tub floor before a short cycle. |
| Dish soap | Washing the filter and gasket | Just a few drops in warm water. |
| Old toothbrush | Spray-arm holes and gasket folds | The bristles reach where sponges cannot. |
| Flexible bottle brush or pipe cleaner | Deep spray-arm holes | Useful for jets clogged with hard-water grit. |
| Microfiber cloths | Wiping gasket, door edges, and filter housing | Have two — one soapy, one rinse. |
| A small bowl or measuring cup | Holding vinegar on the top rack | Any oven-safe dish works. |
Step 1: Clean the Filter (The Source of Most Odors)
The filter sits in the bottom of the dishwasher tub, usually under the bottom spray arm. Its job is to catch food particles before they reach the drain pump. When it is clean, water flows freely and drains completely. When it is clogged, water sits in the sump between cycles, bacteria grow, and every load starts with yesterday’s dirty water. That is the wet-dog smell in a nutshell.
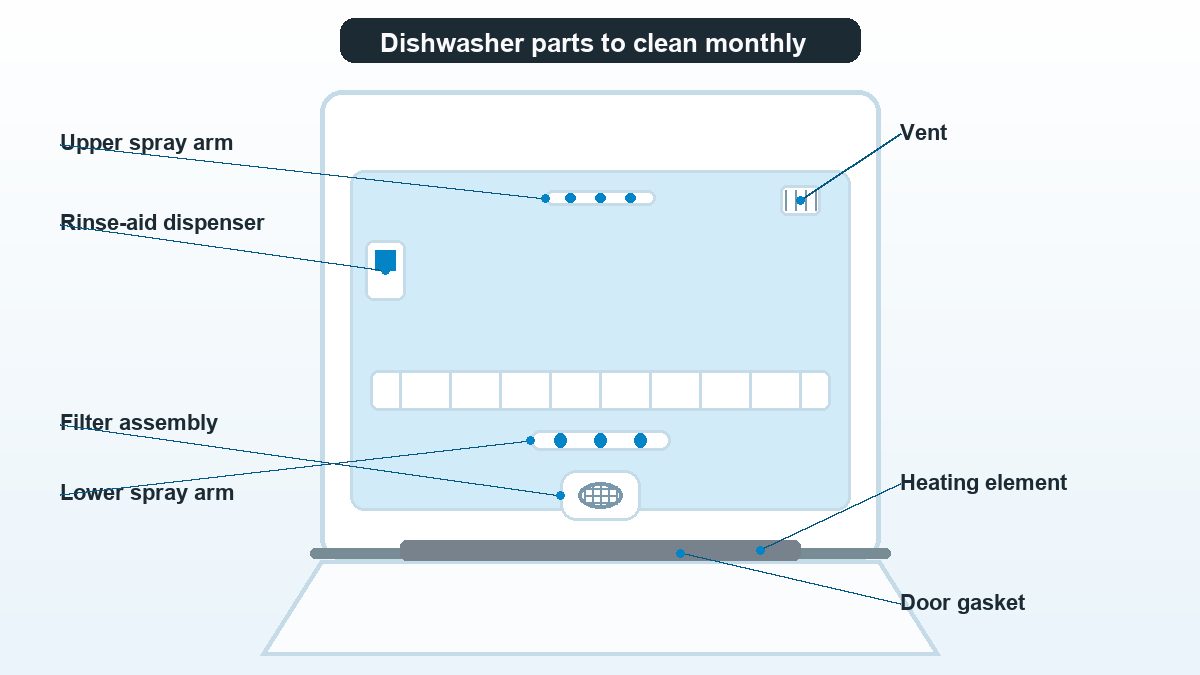
Start by pulling out the bottom rack. Look for a round or cylindrical filter assembly in the center of the tub floor. Most twist counterclockwise a quarter turn and lift straight out. Some have a coarse mesh upper filter that separates from a fine lower filter. Set both pieces in the sink.
Run hot water over the filter from the back side first, so debris washes out the way it came in. If the mesh is greasy, scrub it gently with an old toothbrush and a drop of dish soap. Do not use a scouring pad — the mesh is thin and can tear. Pay attention to the plastic frame, especially the channels where water flows; food paste loves to hide in those corners. Rinse until the water runs clear and no grit remains in the mesh.
While the filter is out, wipe the filter housing in the dishwasher with a damp microfiber cloth. This is the area most people skip, and it is often the dirtiest part of the whole machine. Use the toothbrush to gently scrub the edges of the sump where the filter seats. A clean filter dropped back into a dirty housing just gets re-contaminated.
Let the filter air-dry for a few minutes, then twist it back into place. It should seat firmly and not wiggle. If it feels loose, you may have misaligned the tabs. A loose filter can let food particles into the pump and cause drain errors.
Work left-to-right so debris drains away from the mesh instead of back into the sump.
→
→
→
→
→
Step 2: Clean the Spray Arms (Where Hard Water Attacks)
The spray arms are the water delivery system. Their tiny jets are aimed to hit every rack at a specific angle, and even a partial clog changes the whole wash pattern. If your dishes are dirty in one corner of the top rack but fine everywhere else, a blocked upper spray arm jet is the likely culprit.
Lower spray arms usually lift straight off a center post; upper spray arms often unscrew from the underside of the top rack or the dishwasher ceiling. Again, check the manual if the attachment is not obvious. Once removed, hold each arm under running water and rotate it. You should see water flow freely out of every hole. If a jet is blocked, use the end of a paperclip, a pipe cleaner, or a flexible bottle brush to clear it from the outside in. Do not use a toothpick — it can break off inside and make the clog worse.
For hard-water scale, fill the sink with enough white vinegar to submerge the spray arms and let them soak for fifteen to twenty minutes. The vinegar dissolves calcium deposits without damaging the plastic. After soaking, run water through the jets again and ream any remaining grit. If the holes still look white and chalky, a second soak usually finishes the job. Hard water contains dissolved calcium and magnesium that precipitate out as water heats and dries, leaving the white scale you see on spray arms and glassware. Whirlpool’s product help notes that extremely hard water mineral deposits can damage dishwashers and make good cleaning results harder to achieve.
Before reinstalling, inspect the mounting hardware. A cracked spray arm or worn snap fitting will wobble during the cycle and spray water in the wrong direction. Replacement spray arms are inexpensive and usually snap in without tools.
| Arm | Where it lives | How it removes | What usually clogs it |
|---|---|---|---|
| Lower spray arm | Under the bottom rack, on a center post | Lifts straight up | Food grit, seeds, broken glass |
| Upper spray arm | Underside of the top rack or the dishwasher ceiling | Unscrews or twists off | Hard-water scale, grease film |
Step 3: Scrub the Door Gasket and Seals
The gasket is the soft rubber tube that runs around the dishwasher door or the tub opening. Its job is to keep water inside during the cycle, but its folds also trap food splatter, grease, and moisture. If you have never cleaned it, prepare to be mildly horrified.
Dampen a microfiber cloth with warm water and a drop of dish soap. Run it along the entire gasket, gently pulling the rubber lip away from the metal or plastic frame so you can reach the inner fold. Follow with a rinse cloth, then a dry cloth. For stubborn black buildup, use the old toothbrush with a paste of baking soda and water. The baking soda is mildly abrasive enough to lift residue without cutting the rubber.
Do not forget the bottom edge of the door and the metal lip of the tub. These areas collect drips and are often the source of leaks that look like door-seal failures. A clean gasket seats better, seals better, and lasts longer. While you are there, check for cracks, tears, or flattened spots. A damaged gasket should be replaced; no amount of cleaning will fix a permanent air gap.
Step 4: Run a Vinegar Cycle to Flush the System
With the filter, spray arms, and gasket clean, the last step is to flush the internal plumbing. Place a cup of white distilled vinegar in a bowl on the top rack of an empty dishwasher. Run the hottest, longest cycle your machine offers — usually “Heavy” or “Pots & Pans.” The vinegar circulates through the pump, hoses, and spray arms, dissolving mineral scale and neutralizing odors.
Some people pour vinegar directly into the bottom of the dishwasher. That works, but it also sends a concentrated slug of acid through the pump at once. The bowl-on-the-rack method releases vinegar gradually as the cycle fills and drains, which is gentler on rubber seals and still effective. If the smell is still present after one cycle, run a second cup the following week.
After the vinegar cycle, sprinkle a cup of baking soda across the bottom of the empty tub and run a short, hot cycle. This deodorizes any remaining vinegar smell and lightly scrubs the interior surfaces. The combination leaves the machine smelling neutral and looking brighter inside.
The vinegar cycle is the finishing rinse for the machine itself. It reaches the parts your hands cannot.
Step 5: Wipe the Exterior, Edges, and Vents
The outside matters too. Detergent drips, fingerprints, and water spots build up on the door and handle. Use a damp microfiber cloth with a drop of dish soap, then dry with a clean cloth. For stainless steel, wipe with the grain to avoid streaks.
Lift the door and wipe the top edge where it meets the counter, plus the sides of the tub that are hidden when the door is closed. These spots collect splatter every time you load dishes. If your dishwasher has a vent on the door or side, make sure it is not blocked by grease or dust; poor venting leads to wet dishes at the end of the cycle.
Monthly Maintenance Checklist
Once a month, run through this short list. It takes less than half an hour and prevents the buildup that turns into a project.
- Remove and rinse the filter.Scrub with dish soap if it feels greasy.
- Check spray-arm holes.Ream any that are blocked; soak in vinegar if scale is visible.
- Wipe the gasket and door edge.Use soapy water, rinse, and dry.
- Run a vinegar cycle.One cup of white vinegar in a bowl on the top rack, hottest cycle.
- Run a baking-soda cycle.Cup of baking soda on the tub floor, short hot cycle.
- Wipe the exterior and vent.Finish with a dry cloth.
If your household has hard water, you may need to do the vinegar cycle twice a month. You will know it is time when glasses start clouding again or the heating element looks white and chalky.
Troubleshooting Common Dishwasher Problems
Cleaning solves more dishwasher complaints than most people expect. Here is how the symptoms map to the fixes.
| Symptom | Likely cause | Fix |
|---|---|---|
| Cloudy glasses and chalky film | Hard-water scale on spray arms, filter, or heating element | Vinegar cycle + spray-arm soak; check water hardness |
| Sour or musty smell | Clogged filter trapping food debris | Clean and rinse the filter; run a vinegar cycle |
| Food left on dishes | Blocked spray-arm jets or low water pressure | Clear jets; check filter and inlet valve screen |
| Standing water after cycle | Clogged filter or drain hose | Clean filter; inspect drain hose for kinks |
| Door leaking | Damaged or dirty gasket | Clean gasket; replace if torn or flattened |
| Dishes not drying | Clogged vent or rinse-aid dispenser empty | Clean vent; refill rinse aid |
→
→
→
→
→
→
→
→
→
→
→
→
If cleaning does not solve the problem, the issue may be mechanical — a worn pump, a faulty heating element, or a blocked drain hose. Those are repair-technician territory. For choosing a reliable replacement when repair no longer makes sense, Consumer Reports publishes regularly updated dishwasher ratings and reliability data.
Video Walkthroughs
Sometimes seeing the part move is faster than reading about it. These two short clips cover the same spray-arm and filter work the article describes.
Product Choices That Make Maintenance Easier
The detergents and rinse aids you use affect how often you have to deep-clean the machine. Powder and gel detergents can leave more residue than tablets in some water conditions, especially if you have hard water. A rinse aid is not optional in most modern dishwashers — it helps water sheet off dishes and the interior walls, which reduces mineral spotting and speeds drying.
If you prefer lower-impact cleaners, look for the EPA’s Safer Choice label on dishwasher detergents and rinse aids. Products with this label are reviewed for both performance and ingredient safety, which matters in a machine that vents into your kitchen air. The label does not mean a product is weaker; it means the formulation has been screened to avoid certain solvents, phosphates, and fragrances that can leave residues behind.
Avoid regular dish soap in the dishwasher. The suds can overflow through the door and damage the pump seals. If you run out of dishwasher detergent, hand-wash the load instead of substituting liquid dish soap.
When to Call a Technician
Cleaning handles odor, cloudiness, and minor spray issues. It does not fix mechanical failures. Call a qualified appliance technician if you notice any of the following:
- Loud grinding or buzzing during drain.This can mean something hard is stuck in the pump impeller.
- Water remains after every cycle even with a clean filter.The drain pump or check valve may be failing.
- Visible cracks in the tub or door liner.These can leak into the cabinet and cause water damage.
- The machine trips a breaker or smells like burning plastic.Turn it off and unplug it until a technician inspects it.
Working on pumps, heating elements, or electrical components yourself can void the warranty and create safety hazards. A clean filter and spray arm are homeowner maintenance; everything inside the access panel is professional territory.
Keep the Machine Running Like New
A dishwasher is one of those appliances that quietly earns back its cost in time saved. The trade-off is a small monthly cleaning ritual. Clean the filter so water drains fully. Clean the spray arms so every jet hits its target. Clean the gasket so the door seals and the interior dries. Run a vinegar cycle to flush scale and odors. Do those four things once a month, and the machine will wash better, smell better, and last years longer than a neglected one.
If you are deep-cleaning the whole kitchen, pair this routine with our guide to deep-cleaning a kitchen step by step and the method for cleaning a greasy oven without harsh fumes. The three together cover the biggest grime collectors in the room.
Sources and further reading: Whirlpool’s dishwasher cleaning guide; U.S. Department of Energy dishwasher efficiency guidance; U.S. Geological Survey hard water science; EPA Safer Choice product program; Consumer Reports dishwasher ratings and support resources. This guide reflects hands-on maintenance in a Pacific Northwest household with moderately hard water. Always follow your dishwasher manufacturer’s instructions for removing filters, spray arms, and gaskets.